
How to Add Someone to a Picture Without Making Them Look Pasted In
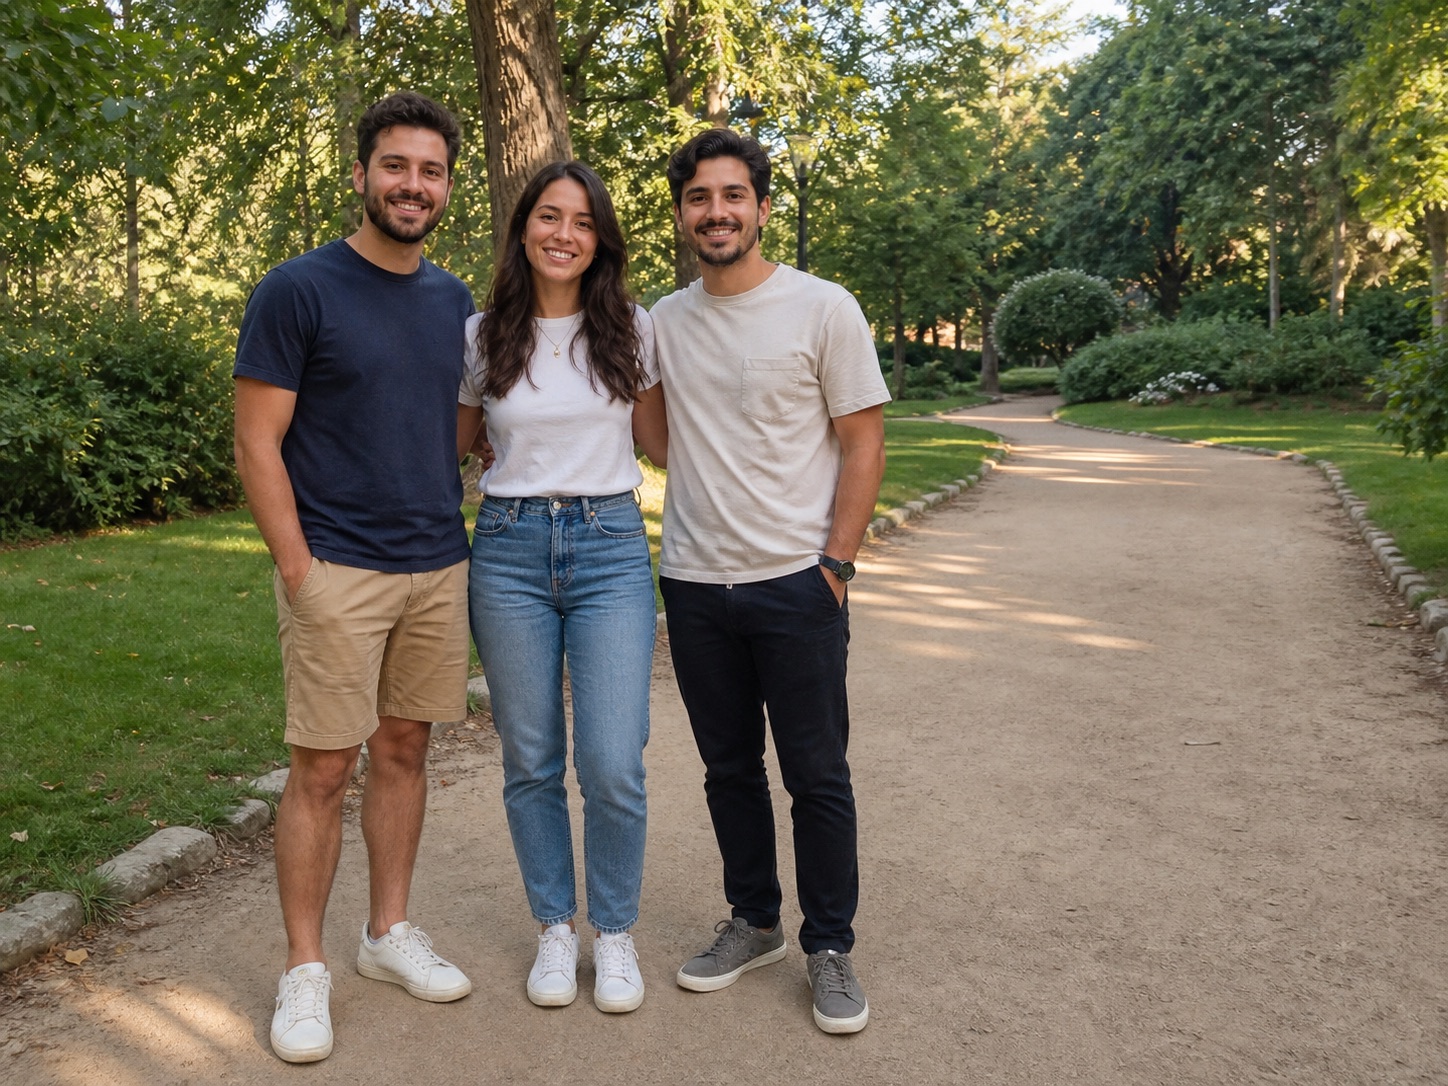
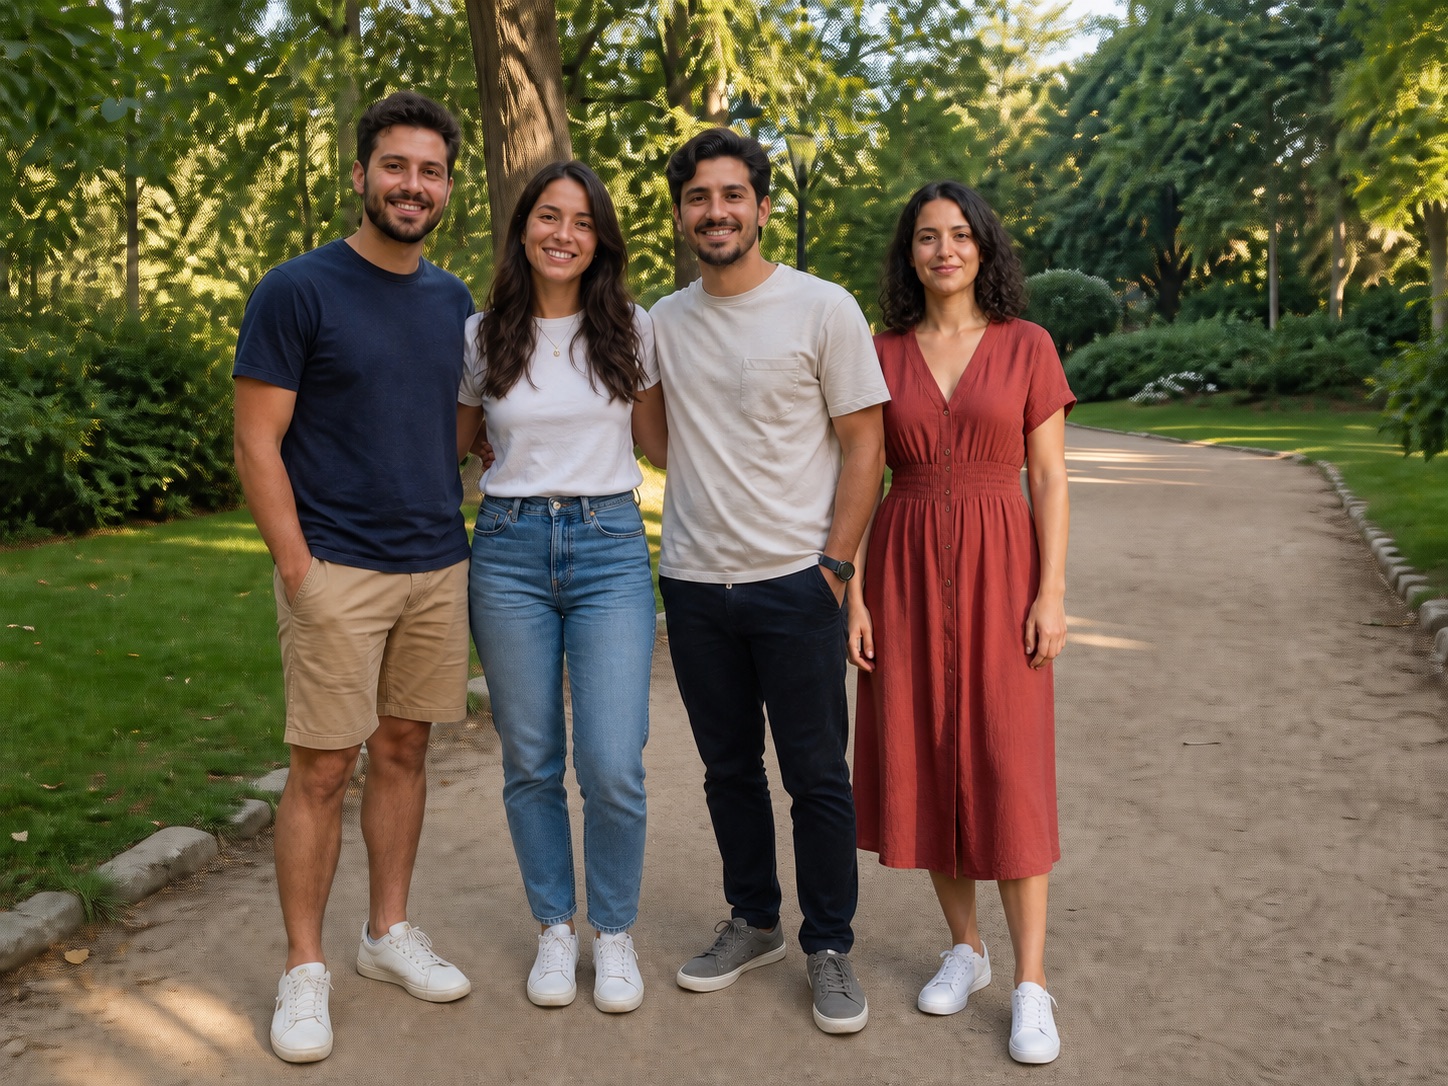
Add one person to your picture
Upload the group picture first, then one clear photo of the person you want to add. Review the result against both originals before downloading.
View tool details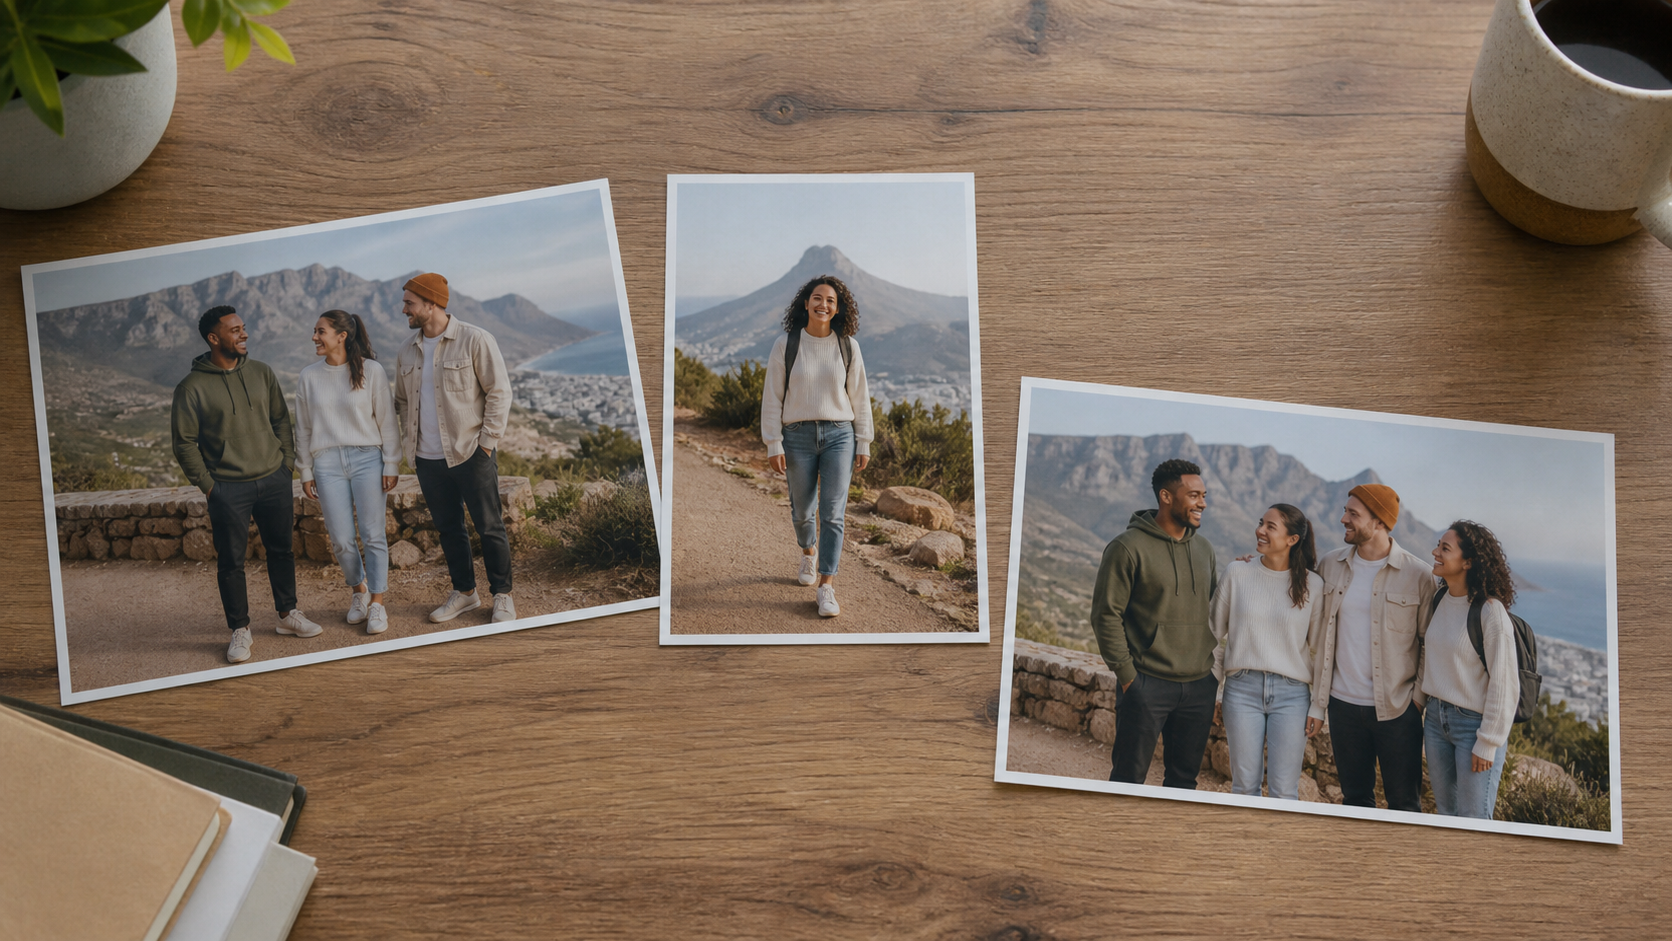
Direct answer: the two-photo rule
To add someone to a picture naturally, start with two compatible photos: a base picture with room for the person and a clear reference taken from a similar camera height and light direction. Add one copy of the reference person, then compare the result with both originals. Check identity, scale, eye line, feet or body contact, shadows, color, sharpness, hair edges, hands, and any background detail near the edit.
The source photos matter more than a long prompt. If the person is partly hidden, photographed from a conflicting angle, or lit from the opposite side, use another reference photo. A guided AI edit is convenient for a plausible pair. A manual layer-and-mask workflow gives you more control when the match is difficult.
Key takeaways
- Choose the base picture and person reference as a pair. Similar camera height, perspective, light, and sharpness make the edit easier.
- Use a reference that clearly shows the person's face, hair, hands, clothing, and the body parts needed in the final pose.
- Leave enough room in the base picture for believable scale, spacing, and contact with the ground or furniture.
- Compare the composite with both originals. Reject changed identity, broken anatomy, floating feet, edge halos, or warped background detail.
- Use a reshoot or manual editor when accuracy matters more than convenience.
Table of contents
- What adding someone to a picture actually means
- Quick source-photo rejection test
- Choose two photos that can plausibly fit together
- How to add someone with ClearCrowds
- Manual method with layers and masks
- Review the composite before downloading
- Common failure modes and the smallest useful fix
- When not to add someone to a picture
- Where ClearCrowds fits and its limits
- Frequently asked questions
What adding someone to a picture actually means
Adding someone to a picture is a photo compositing task. The editor isolates a person from one image, places that person into another scene, and tries to make the two sources agree on perspective, scale, lighting, color, focus, edges, and contact shadows.
That is different from simply placing a cutout on top of a photo. A convincing composite needs the new person to occupy a believable position in the scene. If the group was photographed from chest height, a person photographed from above will carry the wrong perspective. If everyone casts a soft shadow to the right, a reference lit hard from the right will look separate even when its edges are clean.
Adobe's compositing tutorial demonstrates the same underlying sequence: bring an element into a second image, position and resize it, then integrate it with the scene. Adobe's Remove Background documentation also notes that automatic subject isolation may need mask refinement. AI can combine some of these steps, but it cannot make incompatible source photos stop being incompatible.
A composite is a newly constructed image. It should not be presented as proof that the person attended the photographed event.
Quick source-photo rejection test
Reject the pair before editing if any one of these conditions is true:
- the reference hides a hand, shoe, hairstyle, or part of the body needed in the final placement;
- the camera looks down on one photo and up at the other;
- the main light comes from opposite sides or has clearly different hardness;
- the open space in the base picture has no believable ground, seat, or overlap point for the person.
These are structural conflicts. A longer instruction cannot reveal a hidden shoe or make two camera heights agree. Choosing a better reference photo is the smallest useful fix.
Choose two photos that can plausibly fit together
Before you upload anything, compare the two photos side by side.
| Check | A workable pair | Warning sign |
|---|---|---|
| Camera height | Both photos were taken near the subjects' eye or chest level | One looks down from above while the other looks up from below |
| Perspective | Body proportions and the visible ground follow a similar angle | The reference uses a close wide-angle selfie and the base uses a distant camera |
| Body visibility | The reference shows every body part needed in the final placement | Hands, shoes, hair, or one side of the body are hidden or cropped out |
| Pose | The stance can fit the available space without inventing a new body | The reference is seated but the only open position requires standing |
| Light direction | Highlights and shadows fall from roughly the same side | The reference has strong light from the opposite side |
| Light softness | Both are overcast, softly lit, or similarly hard-lit | One uses hard flash and the other uses soft window or outdoor light |
| Sharpness | Face and clothing detail are close in clarity | One file is motion-blurred, tiny, or heavily compressed |
| Open space | The base has room for the person's body and a plausible contact point | Placement would cover a face, require impossible overlap, or leave the person floating |
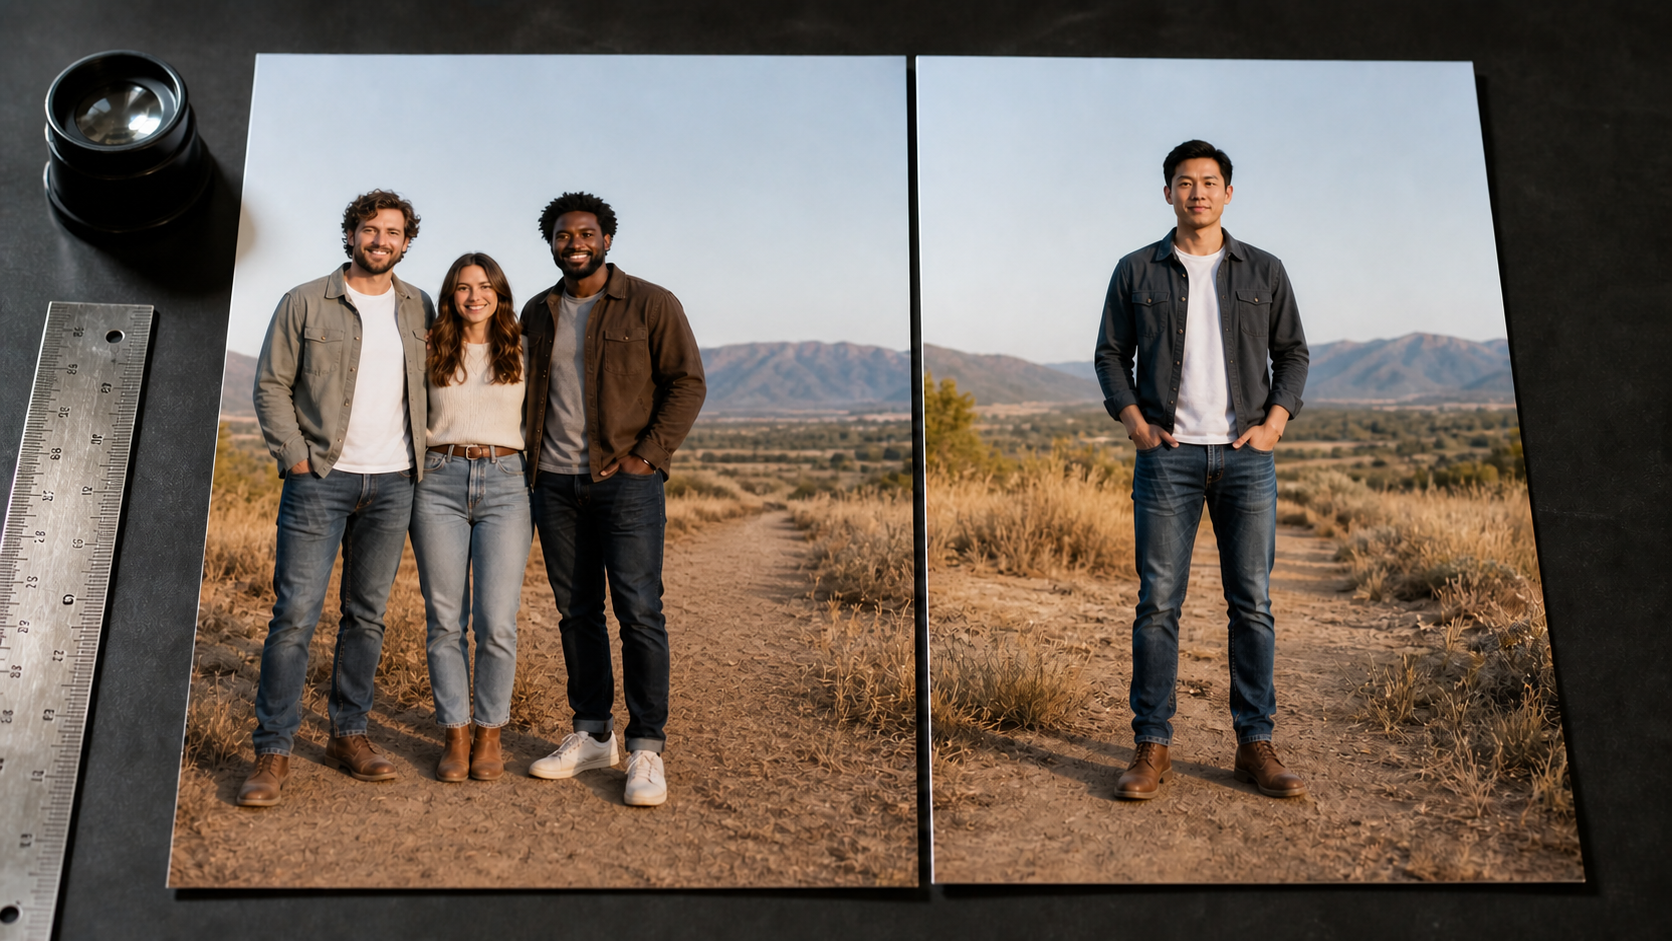
Do not ask the editor to rebuild body parts that the reference never shows unless you are comfortable with invented detail. A cleaner reference with a visible silhouette is usually more useful than a higher-resolution close-up that cuts off the body.
Adobe says clearly defined subjects on simple backgrounds work best in its Harmonize workflow. A plain background is not mandatory, but visible hair, hands, clothing edges, and shoes give either an AI tool or a human editor a more reliable starting point.
Add one person to your picture
- One base picture and…
- Original-first review
- Check the base scene…
Upload the group picture first, then one clear photo of the person you want to add. Review the result against both originals before downloading.
How to add someone with ClearCrowds
ClearCrowds publishes this guide. Add Someone is designed around one base picture and one separate person reference.
- Upload the base picture. Choose the group, family, team, or travel photo that should receive the person.
- Open Add Someone. Follow the labels shown in the current editor.
- Upload exactly one person reference. Use a clear, permissioned photo that passes the compatibility checks above.
- Generate the composite. Use the group picture and person photo as the two source images for one edit.
- Compare all three images. Keep the base picture, reference, and result visible while you inspect identity, anatomy, placement, and background details.
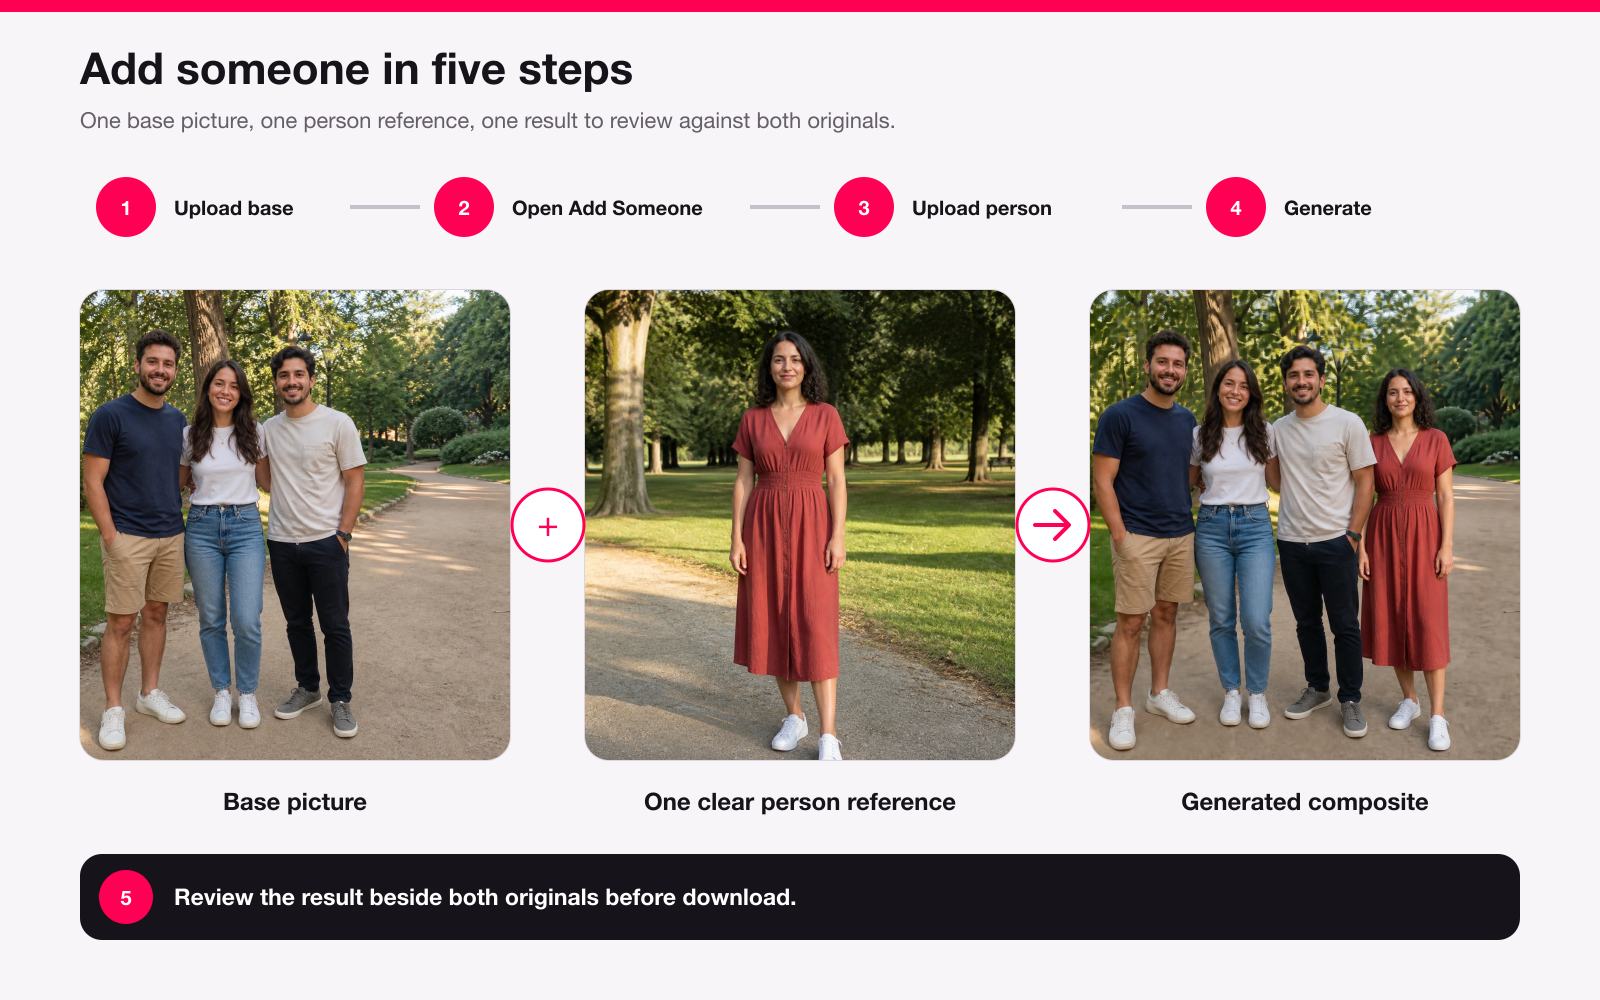
This diagram summarizes the intended workflow. It is not a screenshot of the editor, and the visible controls may change as the product is updated.
The photographs above are AI-generated editorial examples, and the composite is illustrative rather than a guaranteed ClearCrowds result. They show the intended input and review sequence, not a promise that every pair of photos will produce the same result.
The best instruction is narrow: add the person from the reference into the open space and preserve everyone already in the base picture. Do not ask for a new location, new outfits, a pose change, and a person addition in the same edit. A smaller edit scope makes it easier to see what changed.
If the result changes an original face, duplicates the added person, or bends the group around the new subject, reject it. Try another reference with a closer camera angle before adding more instructions.
Manual method with layers and masks
Use a layer-based editor when you need exact control over placement, overlap, or edge cleanup.
- Isolate the person. Remove the reference background and keep the subject on a separate layer. Zoom in around hair, fingers, loose clothing, and shoes.
- Place the person in the base picture. Move the subject into the available space before adjusting color or light.
- Scale without stretching. Resize proportionally. Compare head size, shoulder width, eye line, and foot position with nearby people.
- Refine the mask. Restore missing hair or clothing and remove bright halos from the old background. Use a soft mask only where the real edge is soft.
- Set the overlap order. Decide whether the added person should stand in front of or behind nearby people, furniture, railings, or plants. Mask those overlaps deliberately.
- Match light and color. Adjust brightness, contrast, color temperature, saturation, and local shadow. Adobe's Match Color tutorial shows how adjustment layers can bring sources into the same visual range.
- Match sharpness and grain. A perfectly sharp cutout in a slightly soft phone photo still looks pasted in. Add only enough blur or grain to match the base picture.
- Build contact shadow. Add a restrained shadow where shoes, a chair, or the body meets the scene. Follow the direction and softness of existing shadows.
Manual compositing takes longer, but it lets you repair one variable at a time. It is often the better route for complex hair, important overlaps, a crowded frame, or a client image where placement has to be exact.
Review the composite before downloading
Check the result at full size, then check the crop and size you plan to share. A mistake hidden in a thumbnail may become obvious in a print or profile image.
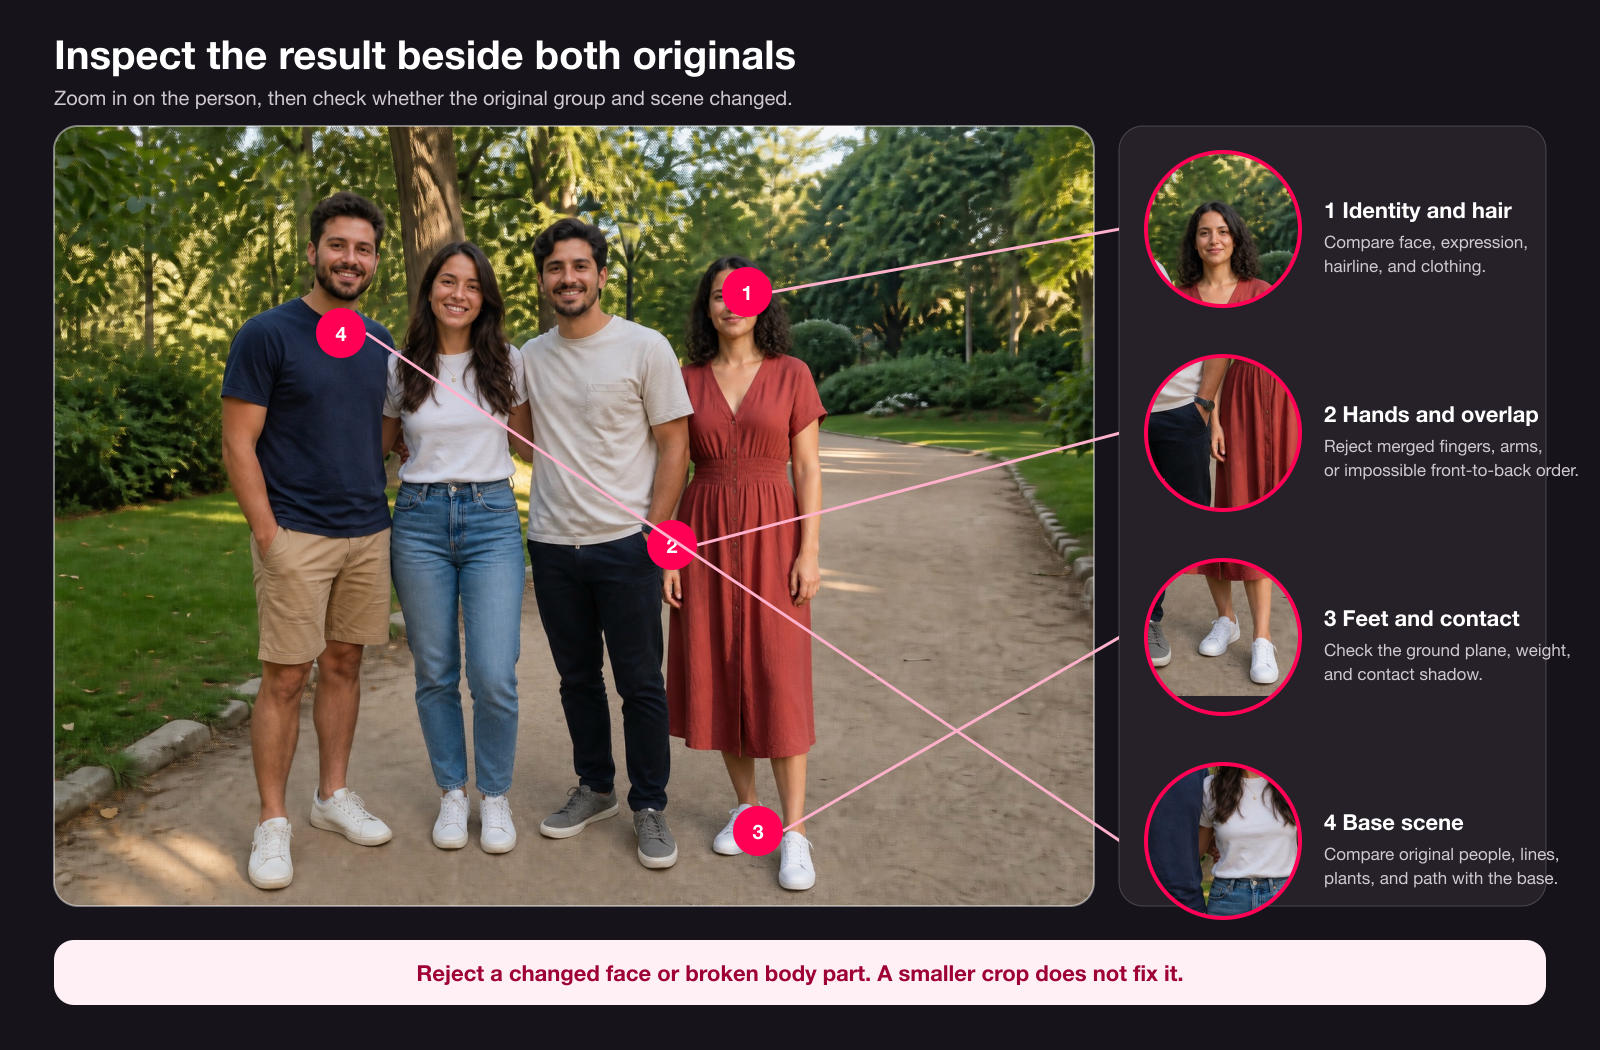
| Review | Pass | Reject |
|---|---|---|
| Identity | Face, hair, clothing, age cues, and expression match the reference | The person looks related but not the same, or clothing details changed |
| Scale and eye line | Height and head size make sense beside the group | The person looks miniature, oversized, or photographed from another camera height |
| Contact | Feet, seat, or body contact sits on a real surface | The person floats, sinks, or has no plausible weight |
| Anatomy and overlap | Hands, legs, and occlusion order remain believable | Extra fingers, merged limbs, duplicated shoes, or impossible overlap appear |
| Light and shadow | Highlight direction, softness, and contact shadow match | The person is lit from the wrong side or casts a conflicting shadow |
| Color and sharpness | Skin tone, contrast, focus, and grain belong to the scene | The subject is much warmer, cooler, sharper, or noisier than everyone else |
| Edges | Hair and clothing meet the background without a cutout line | Bright halo, melted hair, clipped sleeve, or old background remains |
| Base picture | Original people and nearby details stay intact | Faces, hands, paths, walls, or plants drifted around the edit |
Identity and anatomy are stop conditions. Do not hide a changed face or broken hand by exporting a smaller image. Use another result, another reference, or a manual editor.
Common failure modes and the smallest useful fix
| Problem | Likely cause | Smallest useful fix |
|---|---|---|
| Person is too large or too small | Camera distance or perspective conflicts | Use a reference taken from a closer distance and height, or scale manually |
| Feet look like they float | Ground plane or contact shadow is unclear | Move the person to a visible surface or rebuild the contact shadow |
| Hair has a bright outline | Old background contaminated the edge | Use a cleaner reference and refine the hair mask |
| Face or clothes changed | Reference detail was weak or the edit scope was too broad | Retry with a sharper reference and ask only for the person addition |
| Light feels wrong | Light comes from another direction or has different hardness | Choose another reference before attempting broad correction |
| Added person is sharp but group is soft | Sources have different focus or compression | Match blur and grain after placement |
| Existing people changed | Too much of the base picture was regenerated | Reduce the edit scope and preserve all original people explicitly |
| Hands or limbs merge | Placement creates difficult overlap | Move the person into clearer space or use manual masks |
More prompting does not fix every mismatch. When the camera angle, hidden body, or light direction is fundamentally wrong, a different source photo is the efficient fix.
When not to add someone to a picture
Do not use a composite as documentary evidence or to imply that someone attended an event when that claim matters. Avoid this edit for legal evidence, journalism, medical records, financial documents, identity verification, official records, or any context where the image could change a consequential decision.
Use photos you own or have permission to edit. Get the person's consent when the result will be shared beyond a private family or team context. Disclose the composite when a reasonable viewer could otherwise draw a false conclusion about attendance, endorsement, a relationship, or an event.
A reshoot is the better option when factual accuracy matters, the person can still join the group, or the available reference photos do not fit. Editing convenience is not worth creating a misleading record.
For the opposite task, see the guide to removing people from a photo. If you are preparing a portrait rather than changing a group, the home headshot setup guide explains camera height, light, and source-photo quality in more detail. ClearCrowds' privacy policy describes how uploaded information is handled.
Where ClearCrowds fits and its limits
ClearCrowds is a practical fit for permissioned family, travel, team, reunion, and creative pictures when:
- the base picture has a believable place for the person;
- one clear reference shows the identity and body detail the edit needs;
- the two photos have compatible perspective and light;
- you can compare the result with both originals before sharing it.
The workflow does not guarantee exact identity, correct anatomy, perfect edge treatment, or recovery of body parts hidden in the reference. It may change nearby pixels while integrating the person. Difficult pairs may need another reference, a manual editor, or a reshoot.
Maya Chen writes ClearCrowds' practical photo-editing guides; see the author page for related work.
Frequently asked questions
How do I add someone to a group photo?
Start with a group photo that has open space and a separate, clear picture of the missing person. Choose photos with similar camera height, light direction, and sharpness. Add the person once, then compare identity, scale, feet, shadows, hands, edges, and the original group before exporting.
Can I add a person from one photo to another with AI?
Yes. A two-image AI editor can use one image as the base and the other as a person reference. The result is still generated, so it may change identity, anatomy, clothing, or nearby background detail. Review it beside both originals and reject errors rather than assuming the transfer is exact.
What kind of reference photo works best?
Use a sharp photo that clearly shows the person's face, hair, hands, clothing, and the body parts needed in the final placement. A full-body photo with an unobstructed silhouette is best for a standing group. Similar camera height and light direction matter more than a decorative background.
Why does the added person look pasted in?
The usual causes are wrong scale, conflicting perspective, floating feet, mismatched light, different sharpness, an edge halo, or missing contact shadow. Check those separately. If perspective or lighting is fundamentally different, choose another reference instead of forcing the edit.
Can I do this on an iPhone or Android phone?
Yes. Browser-based and mobile photo editors can accept two images, and the compatibility rules are the same. Use the original files rather than screenshots, zoom in for review, and keep both source photos available so you can compare the result before saving it.
When should I use Photoshop instead of an AI workflow?
Use a layer-based editor when you need precise scale, masking, overlap, color, shadow, or edge control. It is also the safer choice when the frame is crowded, hair is complex, the person must stand behind another object, or a client expects detailed corrections.
Should I disclose that a person was added to a photo?
Disclose it whenever the edit could change what a viewer believes about attendance, endorsement, a relationship, or an event. Never present the composite as legal, journalistic, medical, financial, identity, or official evidence.