Real Estate Photo Cleanup: An Honest AI Editing Workflow for Listings
Try this task in ClearCrowds
Clean listing photos with AI presets
Move from the real-estate cleanup guide into a room declutter preset built for cleaner, listing-ready photos.
- Listing-focused
- Room cleanup
- Preset workflow

Real estate photo cleanup means removing small distractions (clutter, stray cables, background people, reflections, and visual noise) so a property looks clear and easy to evaluate. The goal is not to mislead buyers or guests—it is to present the space accurately, with fewer distractions competing for attention.
This guide covers a practical workflow that works for agents, hosts, property managers, and homeowners. It is designed for owned or permissioned photos and for edits that keep the property’s condition truthful.
Key takeaways
- Use AI cleanup to remove temporary distractions (cables, clutter, personal items), not permanent defects or safety issues.
- Make small, targeted selections; large “paint the whole room” edits usually look fake.
- Always check straight lines (cabinets, baseboards, window frames) at 100% zoom before exporting.
- Keep lighting and shadows consistent; obvious mismatches reduce trust.
- If an edit changes a material decision factor, disclose it or use a different photo.
What counts as real estate photo cleanup (and what does not)
Real estate photo cleanup is appropriate when you are making the photo easier to read—removing noise, not rewriting reality.
| Edit type | Usually OK | Usually not OK |
|---|---|---|
| Declutter counters and floors | Removing mail, cords, small clutter | Removing built-in damage or stains that are part of the property condition |
| Remove accidental background people | Erasing a passerby seen through a window | Editing out neighbors, street conditions, or other material context |
| Fix minor distractions | Removing a trash can, stray bag, a reflection of the photographer | Moving walls, changing views, altering room size, adding fake windows |
| Privacy cleanup | Blurring/removing family photos, license plates, documents | Removing disclosures required by law or platform policy |
If your listing photo is used for a purchase decision or rental decision, keep edits conservative and use them to reduce distraction—not to claim something that is not true.
The fastest AI workflow for listing-quality results
The highest-quality results come from a repeatable process:
- Start with the cleanest original file you have. If possible, use the original photo instead of a compressed screenshot.
- Correct the basics first. If the image is too dark or low-contrast, fix exposure/clarity before cleanup.
- Remove one small cluster at a time. For example: cords → countertop items → reflections → background people.
- Inspect at 100% zoom. Look for melted edges, repeated patterns, and warped lines.
- Export and re-check the crop you will publish. A “fine at full size” edit can break after cropping.

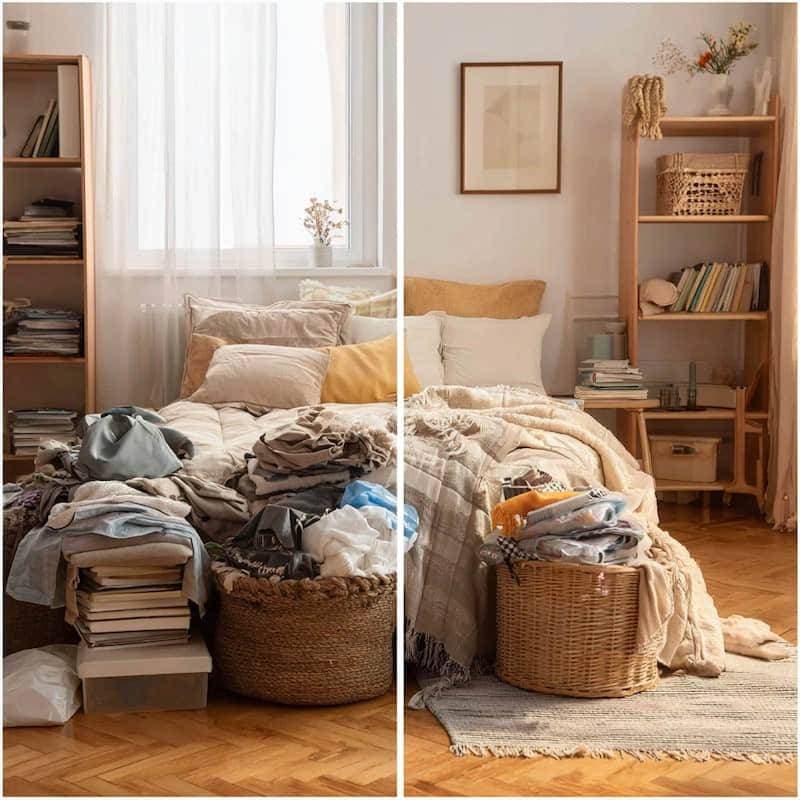
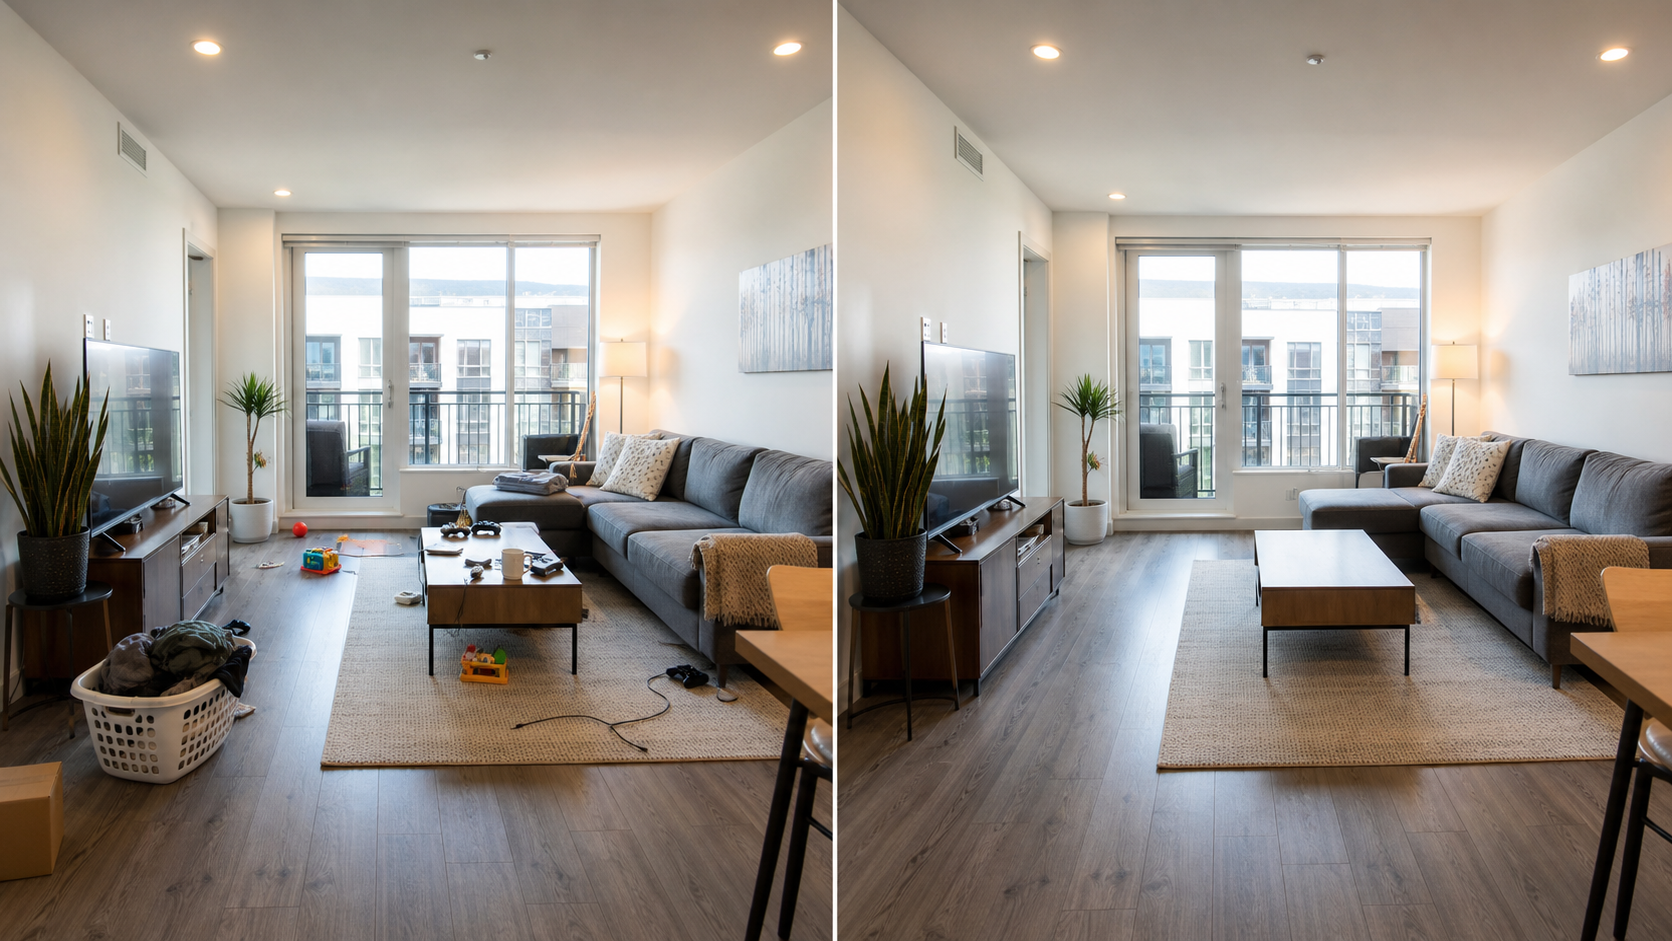
What to remove first (the “high ROI” cleanup checklist)
When you have limited time, prioritize the issues that most often reduce perceived quality:
- Loose cables and chargers on counters, floors, and desks.
- Small clutter (mail, toiletries, kids’ toys, laundry piles, pet bowls).
- Reflections that show the photographer, phone, or messy areas outside the frame.
- Random background people in mirrors, windows, or doorways.
- Visual noise near the hero feature (a fireplace, a view, a kitchen island, a vanity).
Avoid over-editing surfaces. Floors, tile, and wood grain have repeating textures that can look obviously AI-generated if you erase large areas at once.
How to keep AI cleanup looking natural in interiors
Interior listings are unforgiving because straight lines and repeated textures are everywhere. Use these checks:
- Line continuity: cabinet edges, grout lines, baseboards, window frames.
- Texture consistency: wood grain, carpet, tile, stone, paint roller patterns.
- Shadow integrity: objects that were removed may have left a shadow—clean the shadow too, or the scene looks wrong.
- Reflection logic: glass and mirrors should reflect the remaining room; mismatched reflections look suspicious.
If the room has lots of repeating geometry (tile, shelves, blinds), reduce selection size and do multiple passes.
Should you edit or re-shoot? (quick decision table)
AI cleanup is best when you can remove small, temporary distractions. If the photo is fundamentally bad, re-shooting is faster and more trustworthy.
| Situation | Best move | Why |
|---|---|---|
| A few items on a counter or floor | AI cleanup | High impact, low risk of artifacts |
| Photographer reflection in glass | AI cleanup (small selection) | Often fixable without changing the room |
| The room is very dark / noisy | Re-shoot (or fix exposure first) | Cleanup won’t fix poor lighting |
| Large piles of clutter everywhere | Re-shoot + stage | Big fills usually look fake |
| The edit would remove damage or defects | Don’t edit (or disclose) | Material facts should remain visible |
Real estate cleanup vs crowd removal vs object removal
These tasks overlap, but they lead to different editing strategies:
- For removing tourists or photobombers in travel photos, start with:
/posts/remove-crowds-ai-one-click. - For removing background people in a property preview photo, see:
/posts/remove-people-from-photo-online. - For product and listing photo polish in commerce, see:
/posts/ecommerce-photo-editing.
A simple “ethical rule” for listing edits
Ask one question before you export:
If a buyer or guest saw the unedited version, would they feel tricked?
If the answer is yes, the edit is too aggressive for a listing. Use a different photo, take a cleaner shot, or keep the change minimal and disclose it when appropriate.
Where ClearCrowds fits
ClearCrowds is built for “fix this photo problem” workflows: you upload one image, pick a goal (remove clutter / remove background people / privacy cleanup), then iterate with small edits until it looks natural.
A practical real-estate workflow looks like this:
- Upload the listing photo you own or have permission to edit.
- Start with object / clutter cleanup for small distractions (mail, cables, bags, toiletries).
- If you captured background people (mirrors, windows, doorways), use a remove people / crowd cleanup pass next.
- Do a final “naturalness check”: straight lines, texture continuity, and shadows at 100% zoom.
- Export a web-ready version and re-check the final crop.
If you want a broader “remove strangers from a photo” guide, start with: /posts/remove-people-from-photo-online.
FAQ
Can I use AI cleanup to remove clutter from real estate photos?
Yes—removing temporary clutter is one of the best use cases for AI cleanup. Keep selections small, and double-check floors, counters, and edges at 100% zoom so the result still looks like the original room.
Should I remove damage or defects from listing photos?
Generally no. Removing defects can become misleading, especially if it affects a buyer’s expectations. Use cleanup for distractions, privacy details, and small temporary items—not material property conditions.
What photos are hardest for AI cleanup?
Highly repetitive textures (tile, blinds, patterned carpets), strong reflections, and large areas of missing background detail. In these cases, multiple small edits usually beat one big edit.
Summary
Real estate photo cleanup is about clarity—not deception. Remove temporary clutter, protect privacy, and keep the property’s real condition visible. When you keep selections small and check lines/textures/shadows carefully, AI cleanup can produce listing-quality results fast and consistently.